If you’re looking for an easy way to install Mouse Guard on Beehive, you’ve come to the right place. How to Install Mouse Guard on Beehive? This guide will show you everything you need to know, from preparing the hive to installing the guard.
- Begin by putting on your beekeeping suit and gloves
- Next, locate the mouse guard that you will be installing on the beehive
- Carefully remove any bees that may be in the way of the installation process
- Position the mouse guard at the entrance of the hive, making sure it is secure and level
- Slowly pour honey over the top of the mouse guard to attract bees back to their home
Diy Mouse Guard for Beehive?
If you’re like most beekeepers, you know the importance of protecting your hives from mice. But did you know that you can make your own mouse guard for beehives? Here’s what you’ll need to make a DIY mouse guard for beehives:
-1/2 inch plywood -1 inch hole saw -Staple gun and staples
-Paint or sealant (optional) Cut a piece of 1/2 inch plywood into a rectangle that is slightly larger than the opening of your hive. Use a 1 inch hole saw to cut two holes in the plywood, one at each end.
These holes should be big enough for a mouse to get through, but too small for bees. Next, use a staple gun to attach the plywood rectangle to the top bars of your hive. Make sure the holes you cut are facing downwards so that mice can’t climb up and into the hive.
You may want to paint or seal the wood to protect it from weather damage.
Mouse Guard Vs Entrance Reducer
There are two main types of rodent guards: mouse guards and entrance reducers. Both types of guards are designed to keep rodents from entering your home, but they work in different ways. Mouse guards are physical barriers that block rodents from getting inside.
They can be made of metal, plastic, or other materials, and they’re usually placed around doors and windows. Entrance reducers are devices that make it harder for rodents to enter your home by reducing the size of their opening. They can be placed on doors, windows, vents, and other openings.
Which type of guard is right for you depends on your needs and preferences. If you want a permanent solution that will block all rodents from getting inside, a mouse guard is a good option. If you only need a temporary solution or if you want to be able to open and close your doors and windows without removing the device, an entrance reducer is a better choice.
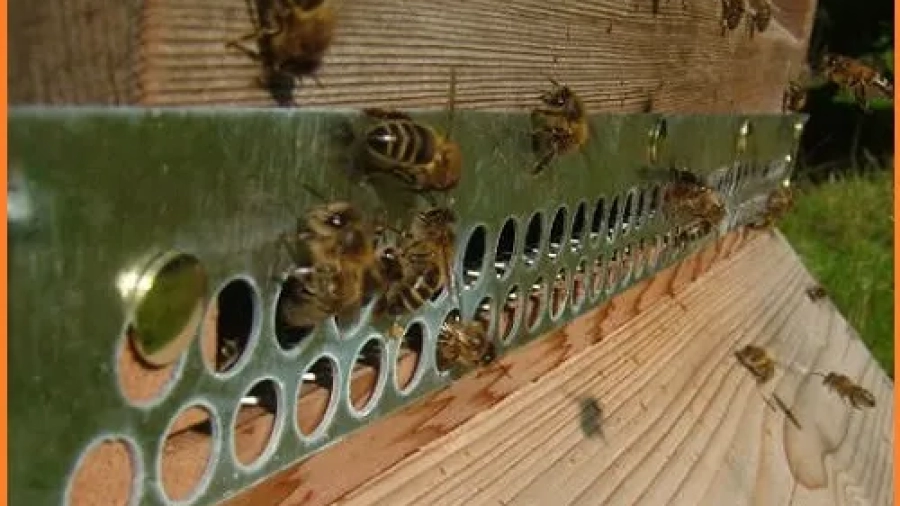
Beehive Mouse Guard Hole Size | How to Install Mouse Guard on Beehive?
What is the right size hole for a beehive mouse guard? This is a question that many beekeepers ask, and there are a few things to consider when choosing the size of hole for your beehive mouse guard. The first thing to think about is the climate in which you live.
If you live in an area with very cold winters, you’ll want to make sure the hole is big enough for the mice to get in and keep warm. On the other hand, if you live in a warmer climate, you might want to make the hole smaller so that the bees can better protect their hive from pests. Another thing to consider is what type of beehive you have.
If you have a standard Lang troth hive, then the holes should be 3/8 inch or less. However, if you have a top-bar hive, then the holes can be up to 1/2 inch. Finally, it’s important to remember that mice are not the only animals that can enter your hive through small openings.
Other critters like wasps and ants can also get through tiny cracks and crevices. So, if you’re concerned about any of these pests getting into your hive, it’s best to err on the side of making your mouse guard holes slightly larger than necessary.
How to Fit a Mouse Guard?
If you have a pet mouse, you may be wondering how to fit a guard on its cage. A mouse guard is a piece of hardware that helps keep your mouse from escaping through the bars of its cage. It is important to choose the right size guard for your cage, as a too-small guard can pose a serious health hazard to your pet.
Here are some tips for choosing and fitting a mouse guard:
The first step is to measure the width of your cage’s bars. Most guards are made to fit standard cage sizes, so this measurement will help you determine what sizeguard you need.
Once you have the measurements, select a guard that is slightly wider than the width of the bars. This will ensure that the guard fits snugly and does not leave any gaps for your mouse to squeeze through.
Next, position the guard over the top of the cage so that it covers the opening completely.
Use zip ties or wire cutters to attach the guard securely to the bars. Be sure not to make the ties too tight, as this could damage the bars or injure your pet.
Entrance Reducer Beehive
If you are looking for an easy and efficient way to harvest honey, then look no further than the Entrance Reducer Beehive! This beehive is designed to allow bees to enter and exit the hive while reducing the amount of bees that can get inside, making it ideal for those who want to harvest honey without having to deal with a lot of bees. The Entrance Reducer Beehive is made from high-quality materials and features a built-in queen excluder, making it a great choice for those who want to keep their hives free of queen bees.
If you want to purchase a Mouse then you may check these reviews the Best Mouse For Chromebook, Top 10 Best Mouse for iMac, Best Mouse for Auto CAD, and the Best Mouse for Programming.
How Do You Put a Mouse Guard on a Hive?
The first step is to find a mouse guard that fits your hive. There are many different sizes and shapes available, so make sure to measure your hive before purchasing a mouse guard. Once you have the right size mouse guard, simply place it over the entrance to your hive.
You may need to use some nails or screws to secure the mouse guard in place, depending on the type of hive you have.
When Should I Put the Mouse Guard on My Hive?
If you have a standard 10-frame Langstroth hive, the mouse guard should be placed on the hive when the outside temperature starts to regularly dip below 55 degrees Fahrenheit. This typically happens in late fall or early winter. The purpose of the mouse guard is to keep mice from getting into the hive and destroying the comb or eating the honey.
Where Does Mouse Guard Go on a Beehive?
The Mouse Guard protect the bees by ensuring that the hive is free of pests and predators. They also help to keep the hive clean and orderly.
How Do I Keep Mice Out of My Beehive?
There are a few things you can do to keep mice out of your beehive:
1. Inspect your hive regularly and look for any signs of mouse activity, such as droppings or nesting material. If you find evidence of mice, take action to remove them right away.
2. Keep your hive clean and free of debris that might provide a hiding place for mice. Regularly trim back any vegetation that is growing close to the hive.
3. Place your hive on a stand or platform so that it is raised off the ground.
This will make it more difficult for mice to access the entrance hole.
4. Install a mouse guard at the entrance to your hive. This will prevent mice from being able to enter, but will still allow bees to come and go freely.
Last Word
Assuming you would like a summary of the blog post titled “How to Install Mouse Guard on Beehive”:
The author begins by stating that, while many beekeepers use mouse guards to protect their hives from mice, they can be difficult to install. He then proceeds to give a step-by-step guide on how to properly install a mouse guard on a beehive.
First, the beekeeper should remove the hive’s inner cover and set it aside. Next, they should take the mouse guard and place it over the hole in the outer cover. The final step is to replace the inner cover, making sure that it is flush with the top of the mouse guard.
The author notes that this process can be tricky, but offers some helpful tips for those struggling with it. Overall, he emphasizes that proper installation of a mouse guard is essential for keeping bees safe from predators.