In order to uninstall Wineskin Mac, you will need to follow the steps below. How to Uninstall Wineskin Mac? First, you will need to find the Wineskin icon and right-click on it. Once you have done this, a menu will appear and you will need to select the “Uninstall” option.
After selecting this option, a confirmation message will appear asking if you are sure that you want to uninstall Wineskin Mac.
How to Uninstall Wineskin Mac?
You will need to click on the “Yes” button in order to confirm that you would like to proceed with the uninstallation process.
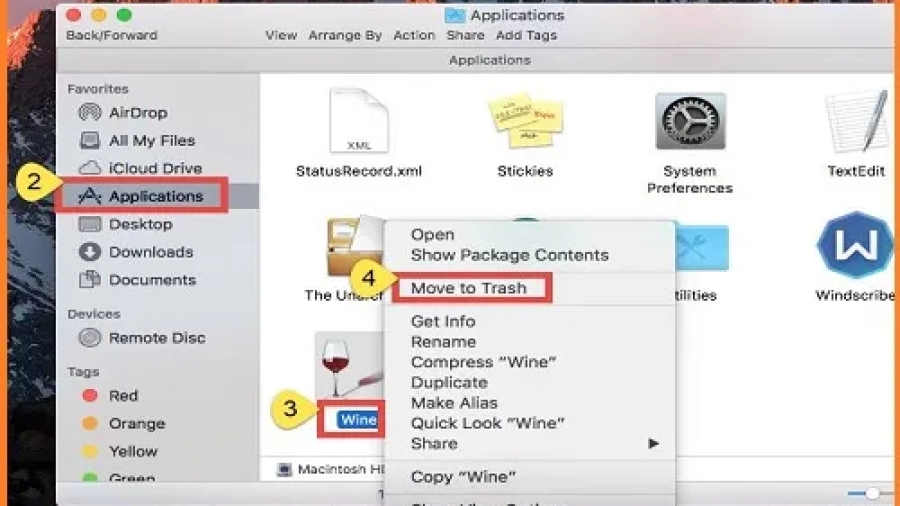
- 1) Launch Finder and navigate to your Applications folder
- 2) Right-click on the Wineskin app and select “Move to Trash
- ” 3) Empty your Trash
To uninstall Wineskin from your Mac, follow these steps:
- Locate the Wineskin application in your “Applications” folder or wherever you have it installed.
- Drag the Wineskin application icon to the Trash bin in your dock or right-click on it and select “Move to Trash.”
- Once the Wineskin application is in the Trash bin, right-click on the Trash bin icon in your dock and select “Empty Trash” to permanently delete Wineskin from your system.
- Alternatively, you can press “Command + Shift + Delete” on your keyboard to directly empty the Trash bin without right-clicking.
Please note that uninstalling Wineskin alone does not remove any Windows applications or games you may have installed using Wineskin wrappers. If you have Windows programs or games installed through Wineskin, you will need to manually delete the individual wrappers and associated files. These files are typically located in the “/Applications/Wineskin” folders.
Where Does Wineskin Install on Mac?
Assuming you are referring to the popular Windows emulator Wineskin Winery, it installs in your Applications folder. Wine is a free and open source compatibility layer that aims to allow applications and games developed for Microsoft Windows to run on Unix-like operating systems. Wine also provides a software library, known as Winelib, against which developers can compile Windows applications to help port them to Unix-like systems.
Wineskin Winery is a helper application used to manage Wineskin wrappers; It handles downloads and installation of new engines, creation of new wrappers, etcetera.
In addition it also has an Engine switcher utility built in so switching between different versions of Wine is very easy. While Wineskin Winery is meant for power users there are some graphical frontends available: WSGA (Wine Skin Graphical Assistant) and Q4Wine.
Is Wineskin a Mac?
Wineskin is a tool used to make wrappers for running Windows applications on macOS. The advantage of using Wineskin is that it doesn’t require any configuration files or changes to your system in order to run the wrapped application; all you need is the Wineskin wrapper and the Windows application itself.
Wineskin was originally developed for use with Darwine, but has since been adapted to work with other Wine versions as well.
There are two parts to a Wineskin wrapper: the engine, which is responsible for running the Windows application, and the Wrapper, which contains all the necessary files and configurations.
The engine is typically packaged as a .app file, while the Wrapper is a directory that contains everything else required to run the Windows application.
To create a new Wineskin wrapper, you first need to download and install Wineskin Winery. Once installed, launch Winery and click on the ‘Create New Blank Wrapper’ button.
Give your new wrapper a name and choose an appropriate engine from the drop-down menu.
Click ‘Create’ and wait for Winery to finish creating your wrapper. Once it’s done, open Finder and navigate to your Home folder (or wherever you saved your new wrapper). Right-click on the wrapper folder and select ‘Show Package Contents’.
You should now see two folders inside: ‘Drive_C’ and ‘Wineskin’. The former contains all of the files necessary for running your Windows application, while the latter houses important configuration files needed by Wine. To install a Windows program into your new wrapper, simply copy its EXE file into the ‘Drive_C’ folder.
You can then launch it by double-clicking on its EXE file or by opening up Terminal and entering ‘/path/to/your/wrapper/name’.exe’.
How Do I Download Wineskin on Mac?
To download Wineskin on Mac, follow these steps:
- Visit the official Wineskin website or a reliable source that provides Wineskin downloads.
- Look for the latest version of Wineskin available for Mac and click on the download link.
- Once the download is complete, locate the downloaded file (usually in your “Downloads” folder) and double-click on it to extract the contents.
- A new window will open with the Wineskin application icon. Drag and drop this icon into your “Applications” folder to install Wineskin.
- After installation, you can launch Wineskin by going to your “Applications” folder and double-clicking on the Wineskin icon.
- To use Wineskin, you will also need to have the Windows executable file (like a .exe file) of the Windows program or game you want to run.
- With Wineskin open, click on “Create New Blank Wrapper” or “Install Software” to set up a new wrapper for your Windows application.
- Follow the prompts in the Wineskin interface to select the Windows executable file and configure the wrapper settings as needed.
- Once the setup is complete, you can launch your Windows application through the Wineskin wrapper by double-clicking on it.
Remember to always download software from trusted sources to ensure you are getting the official and safe version of Wineskin.
Once the file has downloaded, double-click it to unzip, then double-click again to open. You should see a window that looks like this: Click ‘Create New Blank Wrapper.’
You will be prompted to name your new wrapper and choose where you would like it saved. For the purposes of this tutorial, we will name it ‘My Wrapper’ and save it to the desktop. Wineskin will now create your new wrapper and open up a second window with several options; for now, we are only concerned with ‘Select Installer.’
Now just wait for Wineskin to do its thing! When it’s done, you should see a message reading ‘Done!’ in the bottom left corner of the window; close out of both windows. Congrats!
Read also related resources
Where is the Fuse in an Electric Baseboard Heater?
Which of the Following are Key Benefits of Web-Based Mail?
Goodbye And Good Riddance Receipt Rug
How to Steal a Million Watch Online Free?
Ronnie Radke Book I Can Explain
How to Uninstall Wine on Mac
Assuming you have installed Wine through Homebrew:
1. Open your Terminal and type in `brew uninstall wine`. You will be prompted to confirm the uninstallation; hit enter/return to continue.
2. Once the process is complete, exit out of the Terminal. 3. That’s it! You have now successfully uninstalled Wine from your Mac computer.
How to Delete Apps on Macbook
If you’re like most people, you probably have a ton of apps on your Macbook that you never use. Here’s how to get rid of them and free up some space!
To delete an app, simply hold down the Command key and click on the app’s icon.
A menu will pop up asking if you want to delete the app. Click “Delete” and the app will be permanently removed from your computer.
If you have a lot of apps to delete, you can also do it from the Finder.
Go to the “Applications” folder and then select all of the apps you want to get rid of. Right-click (or Control-click) on one of them and choose “Move to Trash.” All of the selected apps will be moved to your Trash can, which you can then empty by right-clicking on the Trash icon in your Dock and selecting “Empty Trash.”
And that’s all there is to it! Deleting unwanted apps is a great way to declutter your Macbook and free up some space.
Conclusion
If you’ve installed Wineskin on your Mac and decide you no longer want it, uninstalling is easy. Just follow these steps:
1. Open the Applications folder and find the Wineskin app.
2. Right-click (or Control-click) on the app and choose “Move to Trash.”
3. Empty the Trash to complete the uninstallation.