I’m going to show you how to build a simple circuit bent Speak & Spell. This is a great project for beginners because it doesn’t require any special skills or tools. Just some basic soldering and you’ll be good to go. Speak And Spell Circuit Bending Schematics with details you’ll get here.
The best part is that you can do it all in an afternoon. So let’s get started!
If you’re interested in making your own Speak & Spell circuit bent instrument, there are a few things you’ll need to know first. Circuit bending is all about shorting out different parts of a circuit board to create new and interesting sounds. By following a few simple schematics, you can easily create your own bent Speak & Spell.
Speak And Spell Circuit Bending Schematics
To start, you’ll need to gather a few supplies.
First, you’ll need a Speak & Spell toy. These can be found online or at many thrift stores.
You’ll also need some basic electronics tools like a soldering iron and some wire cutters. Additionally, it’s helpful to have access to a multimeter so you can test your work as you go. Once you have your supplies gathered, it’s time to get started!
The first step is to identify which IC chips are responsible for the different sounds produced by the Speak & Spell. Once you’ve identified these chips, you can begin soldering wires onto them in order to short them out and bend the sound they produce. There are many different ways to circuit bend the Speak & Spell, so feel free to experiment and see what kinds of sounds you can create!
Be sure to document your work so you can replicate it later if needed.
What is a Speak And Spell Circuit Bend
A Speak And Spell circuit bend is a type of electronic musical instrument that uses a speech synthesizer to create sounds. The instrument was originally designed to help children learn how to spell words, but has since been used by musicians to create a wide variety of sounds and music.
The Speak And Spell consists of a series of circuits that generate different tones, which are then combined to create words or phrases.
By altering the circuitry, musicians can change the way the instrument produces sound, creating new and unique timbres. This process is known as “circuit bending.”
Circuit bending is often used to create glitchy, distorted or otherworldly sounds, as it can cause the instrument to produce unexpected and unpredictable results.
This unpredictability is one of the key attractions for many circuit benders, as it allows them to explore new sonic territory and create sounds that would be difficult or impossible to achieve with traditional methods.
If you’re interested in exploring the world of circuit bending, there are plenty of resources available online to get you started. There are also kits available that allow you to build your own circuit-bent instruments.
So dive in and start Bendin’ those Speaks!
How Do I Make a Speak And Spell Circuit Bend
If you’re looking to circuit bend a Speak and Spell, the first thing you need to do is identify which chips are responsible for generating the sounds. In the Speak and Spell, there are three sound-generating chips: an 8-bit CPU, a 12-bit digital-to-analog converter, and a voice synthesizer.
Once you’ve identified the chips, you need to find their respective pins.
The 8-bit CPU has 16 pins, the 12-bit DAC has 20 pins, and the voice synthesizer has 24 pins. Start by soldering wires to these pins so you can connect them to your breadboard or other circuitry.
Now it’s time to start experimenting!
Try connecting different combinations of wires between the various chips’ pins. You might want to use a multimeter to test continuity between pairs of wires before connecting them; this will help you avoid accidentally shorting anything out.
As you experiment, you’ll likely start hearing some strange and interesting sounds emanating from your Speak and Spell!
Keep tinkering until you get the results you’re after. And who knows? Maybe you’ll create something truly unique and wonderful in the process.
What are Some Common Uses for a Speak And Spell Circuit Bend
Speak & Spell circuits are often used to create unique, glitchy sounds that can be used in a variety of ways. For example, they can be used to create strange and unsettling noises for horror games, or to add an element of randomness to music. They can also be used as a creative tool for sound designers, providing a way to create new and interesting sounds.
Related resources
World of Leisure Winners Choice Pool Table
Have a Nice Poop Cross Stitch Pattern Free?
How to Build a 1835 VW Engine?
Trolli Sour Watermelon Sharks Edible 600Mg
Speak And Spell Mods
Speak And Spell Mods are devices that can be used to modify the output of a Speak and Spell device. These mods can be used to change the volume, pitch, or tempo of the spoken words, or to add new sounds and effects. There are many different types of Speak And Spell Mods available, and they can be used to create a wide variety of results.
Some Speak And Spell Mods are designed for use with specific games or applications. Others are more general purpose, and can be used with any type of software. No matter what type of Mod you choose, it is important to make sure that it is compatible with your particular device.
Otherwise, you may not be able to use it at all, or you may experience problems with its performance.
If you’re looking for a way to change up the sound of your Speak and Spell device, then speak and spell mods are definitely worth considering. With so many different types available, there’s sure to be one that’s perfect for your needs.
So why not give them a try today?
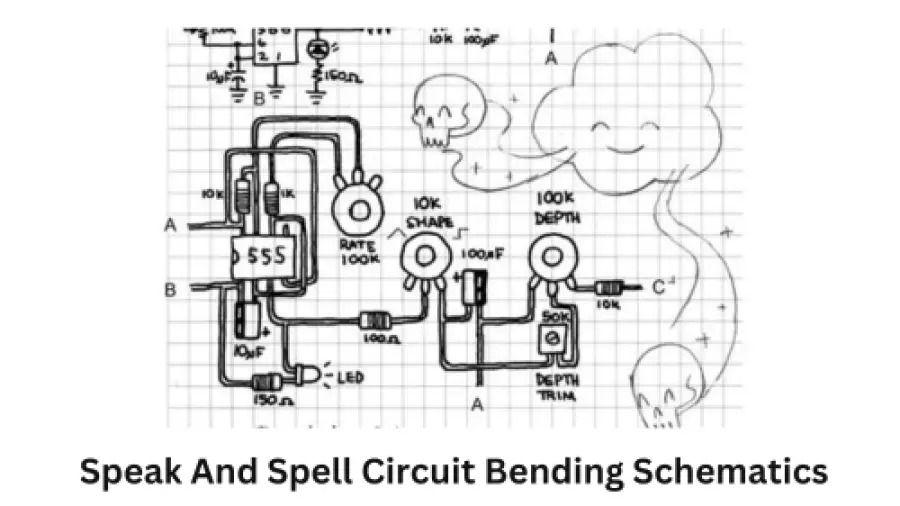
Speak And Spell Schematics
Speak & Spell Schematics The Speak & Spell was one of the first consumer electronic devices to use a microprocessor. It was introduced in 1978 by Texas Instruments.
The device consisted of a keyboard and a small display. It could be used to spell words or generate random words. The original Speak & Spell used a 4-bit TI TMS1000 microprocessor.
This processor had 1,024 bytes of ROM and 64 bytes of RAM. The TMS1000 could only execute one instruction at a time, so it had to be repeatedly reset in order to perform multiple operations. Later versions of the Speak & Spell used the 8-bit TI TMS9900 microprocessor.
This processor had 8K of ROM and 256 bytes of RAM. It could execute up to four instructions per cycle, so it did not need to be reset as often as the TMS1000.
Can You Circuit Bend New Speak And Spell
Yes, you can circuit bend a new Speak & Spell. The process is fairly simple and just requires a few basic tools. You’ll need a soldering iron, some wire, and a Phillips head screwdriver.
Once you have those things, you can follow these steps:
1. Remove the four screws on the back of the Speak & Spell using your Phillips head screwdriver.
2. Carefully remove the back cover, being careful not to break any of the plastic tabs that hold it in place.
3. Locate the “bend” points on the PCB (printed circuit board). These are usually marked with “+” symbols.
4. Using your soldering iron, carefully solder a piece of wire to each of these points.
It doesn’t matter which order you do them in.
5. Attach alligator clips to the other end of each wire (or use whatever method you prefer for connecting them).
6a.
If you want to be able to control the amount of bend manually, connect these wires to potentiometers (variable resistors). Connect one end of each pot’s shaft to ground, and connect the other end to +5V power supply (you can get this from anywhere inside the Speak & Spell – there are plenty of exposed solder pads that will work). Then connect each wiper terminal (the middle pin) to its corresponding alligator clip/wire going off to your pots.
Conclusion
If you’re looking for a way to add some personality to your music, circuit bending may be the answer. This technique involves manipulating the circuitry of electronic devices to create new and unique sounds. While it can be applied to any type of electronics, Speak & Spell toys are particularly popular among circuit benders.
There are a few different ways to go about circuit bending, but one of the most common is to use a breadboard. This is a device that allows you to easily connect and disconnect components without soldering. You can find Speak & Spell schematics online that show you where to make your connections.
Once you’ve made your connections, it’s time to start experimenting! Try playing with the various controls on the toy until you find something you like. If you’re not sure what you’re doing, don’t worry – there’s no wrong way to circuit bend.
Just have fun and see what kinds of sounds you can create!