If your Sony Vaio laptop is overheating, it may be time to clean the fan. You can do this yourself in just a few minutes using some simple tools. First, power down your laptop and unplug it from any power source.
Then, open up the bottom panel and locate the fan. Use a can of compressed air to blow out any dust or debris that may be blocking the blades. Finally, use a soft cloth to wipe down the inside of the fan housing.
To clean your Sony Vaio laptop fan, follow these steps:
- Power off and unplug your laptop.
- Remove the battery (if it’s removable).
- Open the laptop to access the internals.
- Locate the fan and the vent.
- Use a can of compressed air to blow out dust and debris.
- Hold the fan blades steady while cleaning.
- Clean the surrounding areas.
- Reassemble the laptop.
- Power it on to ensure the fan runs smoothly.
How to Clean My Sony Vaio Laptop Fan?
Step 1: Prepare Your Workspace Find a clean and well-lit area to work on your Sony Vaio laptop. Ensure that you have a screwdriver set (usually Phillips-head) and a can of compressed air ready.
Step 2: Power Off and Unplug Turn off your laptop completely and unplug it from the power source. It’s essential to work on electronics when they’re not connected to electricity to avoid any potential hazards.
Step 3: Remove the Battery (if possible) If your Sony Vaio laptop has a removable battery, take it out to ensure safety during the cleaning process.
Step 4: Locate the Fan Vent Identify the fan vent on your laptop. On many Sony Vaio models, it’s typically on the side or the bottom. It looks like a grille with small openings.
Step 5: Open the Laptop Carefully open the laptop to access the internals. If you’re unsure about this step, you can consult your laptop’s user manual or seek professional assistance.
Step 6: Remove the Cover Use a screwdriver to remove the cover or panel that protects the laptop’s internal components. The exact procedure may vary depending on your specific Sony Vaio model.
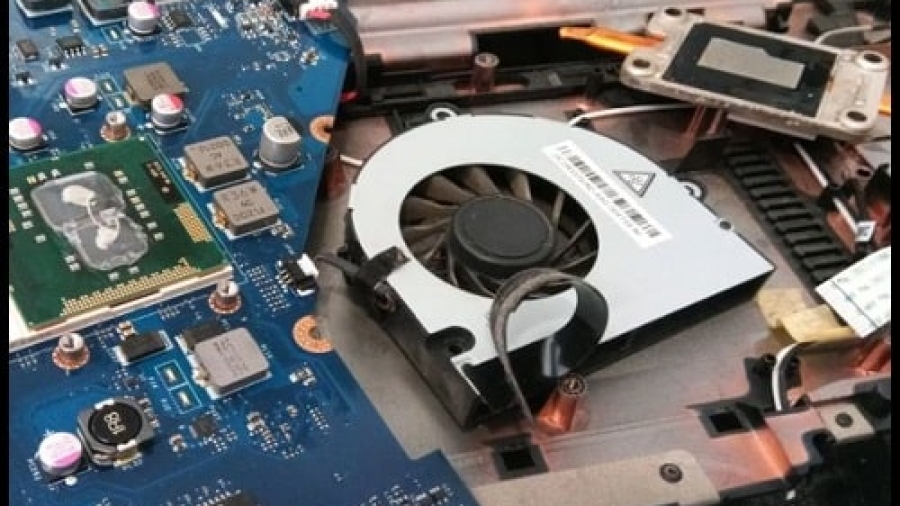
Step 7: Locate the Fan Once inside, locate the cooling fan. It’s a small device with blades that circulate air to cool down the laptop’s components.
Step 8: Use Compressed Air Hold the can of compressed air upright and use short bursts to blow air into the fan vent. Make sure you keep the can upright to prevent any liquid from coming out. This will dislodge dust and debris from the fan.
Step 9: Hold Fan Blades Steady To avoid damaging the fan, gently hold its blades still with your finger while you blow compressed air. This prevents the fan from spinning too fast, potentially causing damage.
Step 10: Clean Surrounding Areas Blow compressed air around the fan and the surrounding components to remove dust and debris. Ensure that the entire area is clean.
Step 11: Reassemble Carefully reattach the cover or panel you removed earlier and secure it with screws. Put the battery back in (if you removed it).
Step 12: Power On Turn on your laptop and ensure that the fan is running smoothly. If it makes unusual noises or doesn’t spin, you might need to seek professional assistance for further maintenance or fan replacement.
How To: Sony Vaio Laptop – Fan Cleaning Step by Step
How Do I Remove the Fan from My Sony Vaio Laptop?
Assuming you need to replace or clean the fan: First, shut down your laptop and unplug it from any power source. Next, flip it over and locate the screws holding the bottom panel in place.
Remove these screws (the number and location of screws will vary depending on your model) and carefully remove the bottom panel. With the bottom panel removed, you should now be able to see the fan.
There are usually two or three screws holding the fan in place – remove these screws and gently pull out the fan (be careful not to damage any of the surrounding components).
You can now clean or replace the fan as needed before putting everything back together.
How Do I Open My Laptop Fan to Clean It?
If your laptop is starting to overheat, or the fan is making strange noises, it may be time for a cleaning. Dust and dirt can accumulate on the fan blades and prevent them from spinning properly. In this blog post, we’ll show you how to open up your laptop and clean out the fan.
First, shut down your laptop and unplug it from any power source. Next, flip it over so that you can access the underside of the device. Most laptops have screws holding down the bottom panel – remove these with a Phillips head screwdriver.
Once the bottom panel is removed, take a look at the fan assembly and locate the screws holding it in place. Again, use a Phillips head screwdriver to remove these screws and set them aside. At this point, you should be able to pull out the fan assembly and give it a good cleaning with compressed air or a soft brush.
Be careful not to damage any of the delicate components inside your laptop as you clean it! Once everything is dust-free, reassemble your laptop in reverse order and enjoy cooler temperatures (and quieter operation).
How Do I Clean My Sony Vaio Hard Drive?
You should regularly clean your hard drive to ensure optimal performance. Here are instructions on how to clean your Sony Vaio hard drive: 1. Backup all important files.
Be sure to create a backup of all important files before you start the cleaning process. This way, if anything goes wrong, you’ll still have access to your important data. 2. Connect an external hard drive or USB flash drive.
You’ll need somewhere to store the files you’re going to delete from your Sony Vaio’s hard drive. Connect an external hard drive or USB flash drive so you can easily transfer the files off your computer. 3. Open “My Computer.”
Find and double-click the icon for “My Computer” on your desktop or in the Start menu. This will open a window displaying all of the drives connected to your computer, including your Sony Vaio’s internal hard drive. 4Click once on your Sony Vaio’s internal hard drive icon to select it, then click the “Drive Tools” tab at the top of the window and click “Cleanup.”
This will launch the Disk Cleanup tool, which will scan your selected drive for temporary and unnecessary files that can be deleted safely. 5 When prompted, choose whether you want to clean up just system files or allies; we recommend choosing “All Files.” Click OK when prompted again and wait for Disk Cleanup to finish scanning your selected drive
6Check each file type listed by Disk Cleanup that you want to be deleted and then click OK when prompted again; this will permanently delete these types of files from your selected disk
How Do I Fix My Sony Vaio Laptop?
If your Sony Vaio laptop is having issues, there are a few things you can try to fix. First, restart the computer and see if that solve Step-by-step the problem. If not, check to make sure all the drivers are up to date.
If they are, try uninstalling and then reinstalling them. You can also try running a virus scan to see if there are any malicious programs causing problems. Finally, if none of these solutions work, you may need to factory reset your best laptop.
Cleaning Sony Vaio Laptop Fan
If you own a Sony Vivo laptop, you may have noticed that the fan can get very dirty. This is because the fan is responsible for cooling the computer and it can accumulate dust over time. If you want to keep your computer running smoothly, it’s important to clean the fan regularly.
Here’s how to do it: 1. Turn off your computer and unplug it from the power outlet.
2. Flip over your laptop so that the bottom is facing up.
3. Use a Phillips head screwdriver to remove the four screws that are holding down the panel that covers the fan. 4. Lift the panel and set it aside. 5. Take a can of compressed air and blow away any dust that has accumulated on or around the fan blades.
Be sure to hold the can upright so that no liquid comes out while you’re doing this. Also, don’t put your face too close to the fan while you’re blowing it out as some of the dust may end up in your eyes or nose. 6.
Once all of the visible dust has been removed, put everything back together by screwing in The screws and snapping The panel back into place. 7 . Turn on your computer to make sure That It’s working properly.
Sony Vaio Laptop Fan Replacement
If you have a Sony Vaio laptop that is overheating, or the fan is making noise, you may need to replace the fan. Here are instructions on how to do so. First, you will need to purchase a replacement fan.
You can find these online or at a local electronics store. Make sure to get the correct model number for your laptop. Next, shut down your laptop and unplug it from any power source.
Remove the battery if possible. Now, locate the screws that hold the bottom panel in place. There should be four screws in total.
Remove these screws and set them aside. Carefully lift off the bottom panel and set it aside. You should now see the fan assembly. There are usually three screws holding it in place.
Remove these screws and carefully pull out the old fan. Install the new fan by reversing these steps. Be sure to use thermal paste on The new fan before installing it.
This will help conduct heat away from The CPU and prevent your laptop from overheating again in the future.
If you want to purchase a Laptop then you may check the Best Laptops For Computer Science Students, Best laptops for programming students, and the best laptop under 700 for gaming.
Sony Vaio Loud Fan
If you’ve ever owned a Sony Vaio, you know that one of its most distinctive features is the loud fan. Some people love it because it makes them feel like they’re getting their money’s worth out of their laptop. Others find it incredibly annoying, especially when they’re trying to work or watch a movie in silence.
There are a few things you can do to try to lessen the noise coming from your fan. One is to make sure that nothing is blocking the vents on your laptop. Another is to clean the dust out of the fan regularly with compressed air.
Finally, you can try changing some of the settings in the Vaio Control Center software. If none of those things work for you, then you might just have to accept that your Vaio is going to be noisy and learn to live with it. Or, you could always try shopping for a different brand of laptop altogether!
Final Note
If your Sony Vaio laptop is starting to overheat, it may be time to clean the fan. Here’s a simple guide on how to do just that: 1. First, shut down your laptop and unplug it from any power source.
2. Next, flip it over so you can access the bottom panel. 3. Remove the screws that hold the bottom panel in place and carefully remove the panel itself. 4. Locate the fan and use a can of compressed air to blow away any dust or debris that may have accumulated on it.
Be sure not to touch the fan blades with anything as they are very sharp!
5. Once you’ve cleaned off the fan, replace the bottom panel and screw it back into place.