Are you ready to take amazing photos? How to Put a Camera on a Tripod Great photos need a steady camera A tripod can keep your camera still.
Although tripods are usually created to be versatile and compatible with the majority of cameras, not every tripod is guaranteed to be suitable for all cameras. Tripods commonly feature a screw located on the top of the tripod head, which is utilized for connecting the camera to the tripod.
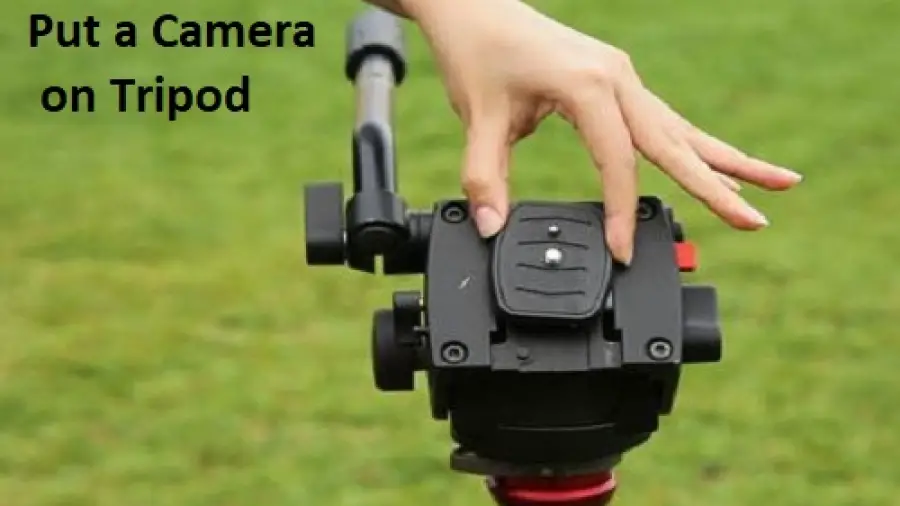
Step 1: Get to Know Your Tripod
First, look at your tripod parts.
You will see legs, a top, and some knobs.
The top part holds your camera.
Step 2: Open the Tripod Legs
Place your tripod on the ground.
Pull the legs out one by one.
Make sure it is stable.
Step 3: Understand the Quick-Release Plate
This plate screws onto your camera.
It clips onto the tripod top.
Step 4: Find the Camera’s Mounting Hole
Turn your camera upside down.
Look for a small, threaded hole.
Step 5: Attach the Quick-Release Plate to Your Camera
Hold the plate against the mounting hole.
Turn the plate’s screw clockwise.
Make it snug, but not too tight.
Step 6: Secure the Camera to the Tripod
Now take the camera (with the plate).
Match it to the tripod top.
Press down until it clicks in place.
How to Put a Camera on a Tripod?
Here’s a concise guide on how to put a camera on a tripod:
-
Check Compatibility: Ensure your camera has a tripod mount. Look for a small hole with screw threads on the bottom.
-
Prepare the Tripod:
- Extend the legs and position the tripod.
- Adjust the height and level it.
-
Attach the Camera Plate:
- Remove the camera plate from the tripod.
- Make sure it matches your camera’s screw size.
-
Mount the Camera:
- Screw the camera onto the plate.
- Tighten securely.
Let’s Review with Pictures!
| Step | What to Do | Picture |
|---|---|---|
| 1 | Identify tripod parts |  |
| 2 | Open tripod legs |  |
| 3 | Look at the release plate |  |
| 4 | Find mounting hole |  |
| 5 | Attach plate to camera |  |
| 6 | Click camera on tripod |  |
Tips to Remember:
- Check for Tightness: Ensure the plate is secure.
- Level the Tripod: Use the bubble level if there’s one.
- Handle with Care: Be gentle with the camera and tripod.
- Practice: Try attaching the camera a few times.
Troubleshooting Common Problems
Stuck plate? Ask an adult for help.
Tripod won’t level? Adjust the legs.
Camera not clicking in? Double-check the steps.
Read also more related topics: Why Won’t My Canon Camera Turn on?
Why My iPhone Camera is Blinking?
Frequently Asked Questions Of How To Put A Camera On A Tripod
How To Attach Camera To Tripod?
To attach a camera to a tripod, align the camera’s base plate with the tripod head’s screw and secure it firmly by twisting the locking knob.
Is A Universal Tripod Compatible With All Cameras?
Most universal tripods feature standard screws that fit the majority of camera base plates, enabling compatibility with various camera models.
What Safety Precautions Should I Take When Using A Tripod?
Ensure the tripod’s legs are stable and fully extended, check that the locking mechanisms are engaged, and avoid placing the tripod on uneven surfaces to prevent accidents.
Can I Adjust The Tripod Height After Mounting The Camera?
Yes, you can adjust the tripod’s height by extending its legs or center column, even after the camera is mounted, to achieve the desired shooting angle.
What Is The Best Way To Secure A Camera On A Tripod?
The best method is to gently twist the camera onto the tripod’s mounting screw until it’s tight, then use the lock knob to secure the camera in place.
Why Won’t My Camera Attach To The Tripod?
If your camera doesn’t attach to the tripod, check for compatibility issues between the camera’s base plate and the tripod’s mount, or inspect for damaged threads on either component.