To take a screenshot on an Asus laptop, press the “PrtSc” key or “Fn”+”PrtSc” for full-screen capture. For a specific window, use “Alt”+”PrtSc”.
Capturing the perfect moment on screen is a simple task on an Asus laptop. Whether it’s for work, saving a digital receipt, or sharing a snippet of a video call, knowing how to take a screenshot can be surprisingly handy.
Asus laptops come equipped with quick keyboard shortcuts that make screen capturing a breeze. Users find this functionality vital for a multitude of tasks, from troubleshooting issues to saving important information swiftly. With just a few key presses, you can instantly capture whatever is displayed on your
laptop’s screen. Read on as we dive into the methods that allow you to preserve what’s on your display for future reference.
Key Methods For Screenshots
To capture your screen on an Asus laptop, one effective method is the use of
keyboard shortcuts. On most Asus laptops, pressing
Fn + Print Screen will take a full screenshot. For a screenshot of an active window,
Alt + Print Screen is the go-to combination. After pressing these, the image can be pasted and saved from an image editor or a document.
The Snipping Tool, a built-in Windows utility, offers a more nuanced approach. It allows you to select specific areas of the screen to capture with your mouse cursor. The
Snipping Tool provides different modes such as
Rectangular Snip,
Free-form Snip, and
Window Snip, enhancing the flexibility of your screenshots.
For advanced features and convenience,
third-party apps can be very beneficial. Programs like
Lightshot,
Snagit, and
Greenshot offer extensive functionality beyond the basic capturing tools. They enable quick edits, annotations, and easy sharing, which might be especially useful for content creators and professionals.
How Can I Take a Screenshot on My Asus Laptop?
Taking a screenshot is a quick and easy way to capture an image of your computer screen. This can be helpful for capturing important information, sharing ideas, or troubleshooting problems.
There are several ways to take a screenshot on an Asus laptop. Here are three of the most common methods:
Method 1: Using the Windows key and PrtSc key
-
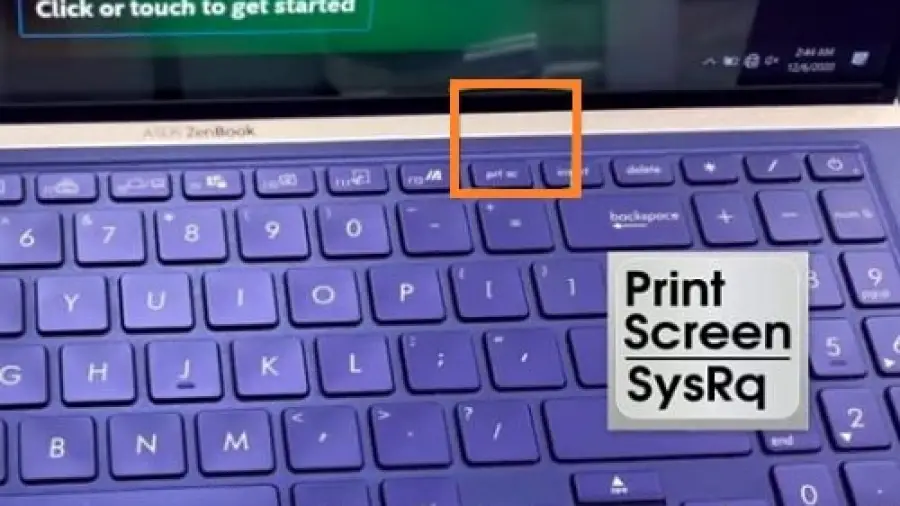
Locate the Windows key and PrtSc key on your keyboard. The Windows key is typically located in the lower-left corner of the keyboard, while the PrtSc key is usually located in the top row of keys.
-
Press and hold the Windows key and PrtSc key simultaneously.
-
A screenshot of your entire screen will be captured and automatically saved to the Screenshots folder within your Pictures library.
Method 2: Using the Snipping Tool
-
Open the Snipping Tool application. You can find this application in the Start menu or by searching for it in the Windows search bar.
-
Select the desired screenshot mode:
- Full Screen: Captures the entire screen.
- Rectangular Snip: Captures a rectangular area of the screen.
- Window Snip: Captures the active window.
- Free-form Snip: Captures a free-form shape of the screen.
-
Click and drag the mouse to select the area you want to capture.
-
A screenshot of the selected area will be captured and displayed in the Snipping Tool window.
-
Click the Save button to save the screenshot to your computer.
Method 3: Using the PrtSc key alone
-
Press the PrtSc key to capture a screenshot of your entire screen.
-
The screenshot will be copied to your clipboard.
-
Open an image editing program, such as Paint or Microsoft Paint, and paste the screenshot.
-
Save the screenshot to your computer.
If you want to purchase a Laptop then you may check some reviews like
Best Laptops for Computer Science students,
Best Laptops for programming Students, and the
Best Laptop for programming and Gaming.
Capturing Specific Areas
Taking a
screenshot on an Asus laptop has never been easier. To select
a window, simply press
Alt + PrtSc. This combination will capture the active window, allowing you to
paste the screenshot into any image editing software or document.
Capturing a custom-sized area on your screen involves using the
Snipping Tool or
Snip & Sketch. With these tools, click on
New, then select the
rectangular or free-form mode. Click and drag the cursor to create a box around the area you wish to capture. Once released, the selected area is snipped and ready to be saved or copied.
Locating And Accessing Screenshots
Immediately after capturing a screenshot on an Asus laptop, the image is typically saved within a default folder. This folder, often labeled as
“Screenshots”, can be found within the
“Pictures” library. This is a convenient location given that most users regularly interact with the Pictures folder when managing images.
Accessing the most recent screenshots is a straightforward process. Utilizing the
File Explorer, navigate to the Pictures library and open the Screenshots folder. Here, the latest screenshot will appear as the most recent file. This ensures swift retrieval of the image for subsequent editing or sharing purposes.
For users needing frequent access to newly taken screenshots, creating a quick access shortcut to the Screenshots folder may enhance efficiency.
Additional Tips For Screenshots
Once you’ve captured a screenshot on your
Asus laptop, you might want to refine it for sharing or documentation purposes. Utilizing an image editing tool–such as Paint, GIMP, or Photoshop–can enable you to crop, annotate, or enhance the image. Features like adding text, adjusting colors, and resizing are integral to creating a
polished screenshot.
To ensure your screenshot maintains its quality across various platforms, consider saving it in a different format. Common formats include
PNG for its lossless quality and
JPEG for its smaller file size and wide compatibility. The choice of format may hinge on your need for image fidelity versus file size. Saving your screenshot as a
PDF can be particularly useful when incorporating the image into documents or presentations.
Frequently Asked Questions Of How Can I Take A Screenshot On My Asus Laptop
How To Screenshot On Asus Laptops?
Taking a screenshot on an Asus laptop is straightforward. Press the “Print Screen” key, then paste the image into an image editor or document.
Is There A Screenshot Tool For Asus?
Asus provides a built-in tool called “Snipping Tool” for taking customized screenshots, accessed through Windows search or the Start menu.
Can I Capture A Specific Asus Screen Area?
Yes, press “Windows + Shift + S” to activate the Snip & Sketch tool, then select the specific area you want to capture on your Asus laptop.
How To Save Screenshots Automatically On Asus?
Automatic saving happens when you press “Windows + Print Screen. ” Screenshots are saved directly to the “Screenshots” folder in “Pictures. ”
What Shortcut Takes A Full-screen Shot In Asus?
For a full-screen capture on an Asus laptop, simply hit the “Print Screen” key. This copies the screenshot for you to paste elsewhere.
Are There Screenshot Editing Options On Asus?
After taking a screenshot, use Windows’ built-in “Paint” or “Photos” app for editing. Right-click the file, select “Open with,” and choose an editor.
Conclusion
Capturing screenshots on your Asus laptop is a breeze once you know the right shortcuts and tools. With the methods outlined in this post, you’ll be adept at saving and sharing your screen in no time. Embrace these steps to effortlessly capture your achievements, troubleshoot, or keep records. Start practicing, and enhance your Asus experience today!