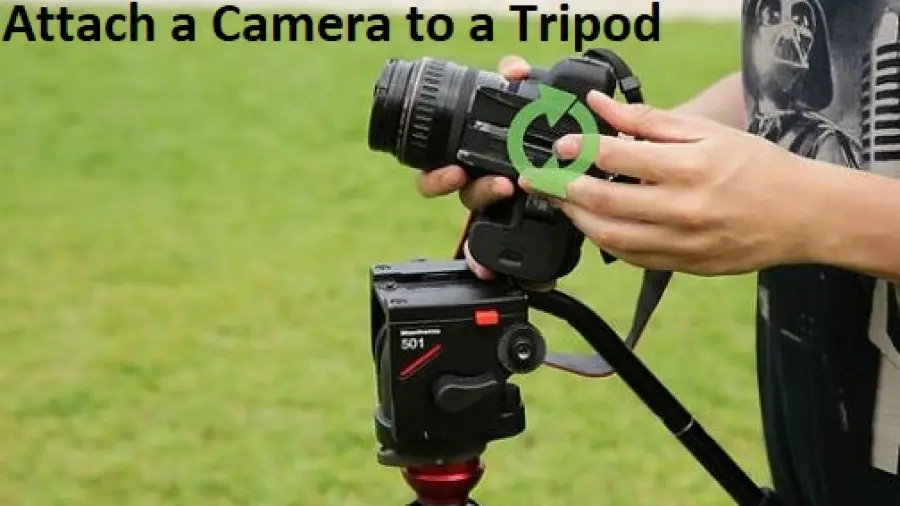
How to Attach a Camera to a Tripod? To attach a camera to a tripod, align the camera’s mounting hole with the tripod’s mounting screw and tighten it securely. Camera attachment to a tripod is a straightforward process that ensures stability and precision when capturing photos or videos.
By properly aligning the camera’s mounting hole with the tripod’s mounting screw, you can securely attach the camera for steady shots. The tripod provides stability and eliminates camera shake, allowing for sharper images and smoother videos. Whether you are a professional photographer or an amateur enthusiast, learning how to attach your camera to a tripod is essential for capturing high-quality visuals.
How to Attach a Camera to a Tripod?
We will guide you through the simple step-by-step process to ensure your camera is securely attached to the tripod.
Here’s a concise guide on how to attach a camera to a tripod:
-
Check Your Camera’s Tripod Mount:
- Look for a small hole with screw threads on the bottom of your camera (usually about 1/4 inch in diameter). This is the tripod mount.
- Ensure your camera has this mount; most modern cameras do, but some smaller ones might not.
-
Prepare the Tripod:
- Remove the camera plate from your tripod. It’s the piece that fixes the camera to the tripod.
- Level the tripod by adjusting the legs. Balancing is essential for stability.
-
Mounting the Camera:
- Screw the camera directly onto the tripod using the matching screw on the camera plate.
- Ensure a secure attachment.
Remember, using a tripod stabilizes your shots and allows for sharper photographs.
Choosing The Right Tripod
Choosing the Right Tripod is crucial for securely attaching your camera and ensuring stability. It’s important to consider factors such as weight capacity, height, size, and the tripod head. Let’s delve into these aspects to help you make an informed decision.
Consider The Weight Capacity
When selecting a tripod, consider the weight capacity to ensure it can support your camera and any additional accessories such as lenses or microphones. Exceeding the weight limit can result in potential damage to your equipment.
Consider The Height And Size
Choosing a tripod with an appropriate height is essential for achieving the desired angles and perspectives in your photography or videography. Additionally, consider the size and portability of the tripod, especially if you plan to travel with it frequently.
Choose The Right Tripod Head
The tripod head is a key component as it facilitates smooth panning and tilting movements. Evaluate different types of tripod heads such as ball heads, pan-tilt heads, and gimbal heads to determine the most suitable option for your specific shooting requirements.
Preparing The Camera For Attachment
Before you can attach your camera to a tripod, it’s important to prepare the camera properly for a secure and steady connection. In this section, we will cover two essential steps to ensure a seamless attachment: securing the camera and removing any lens caps or accessories. By following these steps, you’ll be ready to capture crisp and stable shots with your tripod.
Ensure The Camera Is Securely Fastened
When attaching your camera to a tripod, it’s crucial to ensure a secure fastening to avoid any accidental slips or falls. Here’s a step-by-step guide to help you achieve a solid connection:
- Align the camera screw mount with the tripod mount: Begin by locating the screw mount on the bottom of your camera. This is typically a threaded hole designated for tripod attachment.
- Position the camera on the tripod head: Carefully place the camera on the tripod head, ensuring that the screw mount aligns with the tripod mount.
- Rotate the attachment wheel: Once the camera is positioned correctly, use the attachment wheel or knob provided on the tripod head to turn and tighten the screw mount. Keep rotating until the camera feels securely fastened to the tripod.
By following these steps, you can have peace of mind knowing that your camera is securely attached to the tripod, allowing you to focus on capturing stunning photographs or videos.
Remove Any Lens Caps Or Accessories
Before attaching your camera to a tripod, make sure to remove any lens caps or accessories that may interfere with the attachment process. Here are a few simple steps to help you prepare your camera:
- Take off the lens cap: Remove the protective cap that covers the lens of your camera. This step ensures that the lens is exposed and ready for clear and unobstructed shots.
- Remove additional accessories: Check if there are any accessories, such as external microphones or flash units, attached to your camera. Detach them carefully, allowing you to connect the camera directly to the tripod without any obstacles.
By removing lens caps and accessories, you’ll have a streamlined setup for attaching your camera to the tripod. This will enable you to achieve optimal stability and maneuverability while capturing your desired shots.
Attaching The Camera To The Tripod
Being able to attach your camera securely to a tripod is an essential skill for any photographer. It ensures stability, reduces camera shake, and allows you to capture sharper and more professional-looking images. In this post, we will walk you through the step-by-step process of attaching a camera to a tripod.
Locate The Camera Mounting Screw
The camera mounting screw is a small yet crucial component when it comes to attaching your camera to a tripod. It is usually located on the bottom of your camera, near the tripod socket. To easily spot the mounting screw, look for a threaded hole on the underside of your camera.
Once you have located the camera mounting screw, make sure it is clean and free from any debris that may affect the connection or stability when attaching it to the tripod.
Align The Camera With The Tripod Head
Aligning your camera with the tripod head ensures that it is positioned correctly and securely fastened. Start by placing the camera on top of the tripod head while ensuring that the mounting screw aligns with the tripod’s screw hole or plate.
Make sure the camera is positioned evenly on the tripod head, with the lens facing forward and the camera body aligned with the center of the tripod head. This alignment will help distribute the weight evenly and prevent any imbalance.
Securely Fasten The Camera To The Tripod
After aligning the camera with the tripod head, it’s time to securely fasten them together. Begin by turning the mounting screw clockwise into the tripod’s screw hole or plate, but be careful not to overtighten it.
Ensure that the camera is fastened to the tripod, minimizing any chance of it coming loose during use. Be cautious not to apply excessive force to avoid damaging the camera.
Once you have securely fastened the camera to the tripod, perform a quick check by gently nudging the camera to ensure it is firmly attached. If it moves or feels loose, recheck the alignment and tighten the mounting screw as necessary.
With the camera securely attached to the tripod, you are now ready to explore the endless photographic opportunities that come with the stability and versatility a tripod provides. Remember to always check the tightness of the connection before using your tripod to ensure a stable and safe shooting experience.
Congratulations! You have successfully attached your camera to a tripod, and now it’s time to capture incredible moments with confidence and stability.
Read also more related topics: How to charge a Flip video Camera?
How to Install Ring Peephole Camera?
How to Freeze Your Camera on Zoom?
How Long Do Gas Stations Keep Camera Footage?
Adjusting The Tripod Position
When it comes to capturing crisp and stable shots, adjusting the tripod position is crucial. Properly setting up the tripod ensures that your camera is steady and level, allowing you to capture stunning images or videos with ease.
Extend Or Retract The Tripod Legs
Before attaching your camera to the tripod, it’s important to adjust the height and stability of the legs. Extend the legs to the desired length, ensuring they are balanced and secure. If you’re working on uneven terrain, consider retracting one or more legs to level of the attach Camera to tripod.
Adjust The Tripod Height
Once the legs are positioned, it’s time to adjust the height of the tripod. Use the center column or leg extensions to achieve the desired elevation, making sure to maintain stability throughout the process. A proper tripod height ensures that the camera is at the ideal level for your shots.
Level The Tripod
After setting the height, it’s essential to level the tripod. Use the built-in bubble level or a separate leveling tool to ensure that the tripod head is perfectly parallel to the ground. This step is crucial for achieving balanced and straight images, especially in landscape photography.
Checking Camera Stability
To ensure camera stability, learn how to properly attach your camera to a tripod. By following these steps, you can secure your camera for steady and clear shots.
Ensure The Camera Is Securely Attached
Before testing for stability, it is crucial to ensure that the camera is securely attached to the tripod. Follow these steps to make sure your camera is properly mounted:
- Start by aligning the camera’s mounting screw with the threaded hole on the tripod’s mounting plate.
- Insert the screw into the hole, and using a coin or screwdriver, tighten it securely.
- Give the camera a gentle tug to make sure it is firmly attached and doesn’t wobble.
- Check that the camera is level by using the built-in bubble level or the electronic level in your camera’s display.
Test For Stability
Once you have ensured that the camera is securely attached, it is important to test for stability before starting to shoot. Follow these steps to check if your camera is stable:
- Extend the tripod legs fully and set them up on a flat surface.
- Lock the tripod legs in place by twisting the leg locks.
- Place your hands gently on the camera body and apply slight pressure to test for any movement or wobbling.
- If there is any unwanted movement, tighten the tripod’s leg locks further until the camera remains stable.
- Consider using a remote shutter release or the camera’s self-timer mode to avoid any accidental camera shakes when pressing the shutter button.
- It is also important to consider the weight distribution of your camera and any additional equipment you might have attached, such as lenses or external flashes. Make sure the weight is evenly distributed to maintain stability.
Following these steps will help ensure that your camera is securely attached to the tripod and remains stable throughout your shoot. Checking camera stability is crucial to capturing sharp images without unwanted blurriness or camera shake.
Read also: How to Carry a Camera Without Looking Like a Tourist?
Frequently Asked Questions On How To Attach A Camera To A Tripod
How Do You Connect A Camera To A Tripod?
To connect a camera to a tripod, screw the camera’s mounting plate onto the tripod’s head. Ensure it’s securely fastened before use.
How Do You Attach A Camera To A Tripod Without A Mount?
To attach a camera to a tripod without a mount, you can use a tripod plate or a quick-release system. Simply screw the plate onto the camera’s tripod socket and attach it to the tripod’s head. This ensures stability and allows for smooth camera movement during shooting.
What Holds A Camera On A Tripod?
A camera is held on a tripod by the camera mount located at the top of the tripod’s legs.
Can Any Camera Go On Any Tripod?
Yes, most cameras can be mounted on any tripod with a standard 1/4-inch screw. Ensure the tripod’s weight capacity can support the camera’s weight. Some larger camera setups may require a specialized tripod. Always check compatibility before purchasing.
How Do You Attach A Camera To A Tripod?
Attaching a camera to a tripod is simple. Just align the camera’s mounting screw with the tripod’s mounting plate, then securely tighten the screw.
What Is The Purpose Of A Tripod?
A tripod is used to provide stability and prevent camera shake, resulting in clearer and sharper photos. It is especially useful in low-light situations or when capturing long exposure shots.
Last Word
In sum, attaching a camera to a tripod is essential for stable and professional photography. By following these simple steps, you can ensure a secure and steady setup for your camera. Understanding the proper techniques and utilizing the right equipment will enhance the quality of your photography work.
Mastering this skill will contribute to your overall success as a photographer.